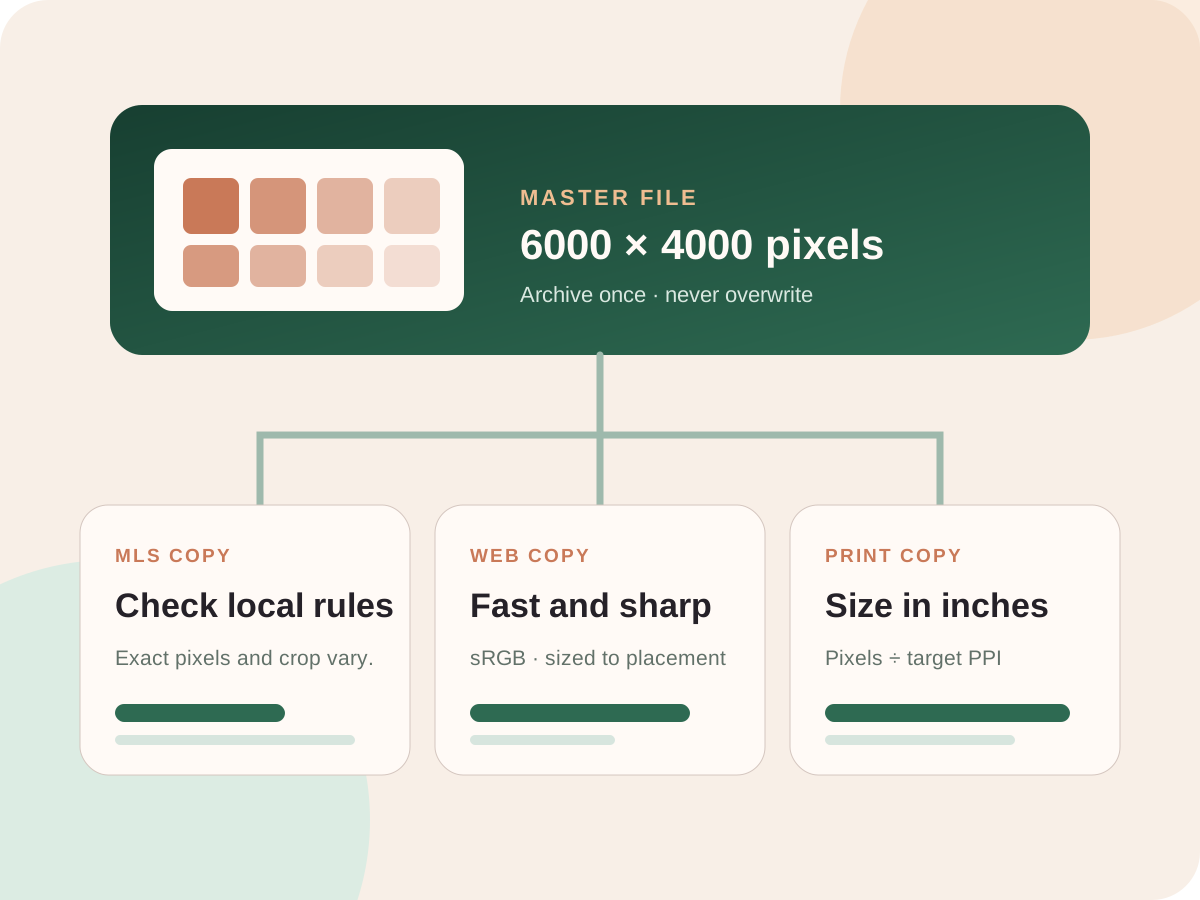
Keep the full-resolution original and export separate copies for listings, websites and print. Changing a file from 72 to 300 PPI doesn't add any detail. The pixel dimensions tell you how much image you actually have.
In this guide
Protect the highest-quality original first
The safest way to work starts with a full-resolution original that's never resized, re-compressed over and over, or saved over. It gives you room to fix verticals, try other crops, meet a new portal rule, prepare for print and check an edited result later.
- Keep the original capture and your best-quality finished edit.
- Work in a lossless or high-quality format that suits your editor.
- Make separate, named copies for the MLS, website, social media, email and print.
- Note the export date, crop, pixel dimensions, colour profile and where it went.
- Never use a small download from a portal as your new original.
Separate pixels, PPI and printer DPI
Pixel dimensions are the actual grid of image information. PPI is how tightly those pixels are packed when you work out a print size. Printer DPI is the dots a printer lays down, and it's not the same thing as image PPI.
Changing the metadata from 72 PPI to 300 PPI without resampling doesn't add detail. It only changes the print size the software calculates. Adobe's current guidance draws the same line, and calls 300 PPI a common target for high-quality prints viewed up close, while pointing out that viewing distance and the printing method matter too.
What can this file deliver?
Enter the real pixel dimensions. The PPI number in the metadata doesn't matter here, because it doesn't add or remove any pixels.
These are the maximum sizes before cropping. Leave spare pixels for straightening, perspective correction, bleed and whatever crop the printer asks for.
Plan aspect ratio before the final crop
A 3:2 camera file, a 4:3 portal slot, a square social post and an 8 × 10 print can't all show exactly the same edges. Exporting is a composition decision, not just a compression setting.
| Before cropping | Protect |
|---|---|
| Exterior | The roof peaks, the driveway, the garden, margins clear of signs and enough sky that the front doesn't feel cramped. |
| Interior | The corners that define the room, window frames, furniture edges and straight verticals. |
| Twilight | The glow of the lights, the roofline, the horizon and shadow detail you can read. Don't crop into the main lighting. |
| The trim and bleed the printer asks for, plus safe space for captions or the page design. |
Keep your crop options open in the original. Don't stretch the photo to force a ratio, and check each important copy at its actual thumbnail or page size.
Choose settings for where the photo will appear
Use sRGB, responsive versions where you can, and enough pixels for the biggest slot it'll appear in, without sending the full original when you don't need to.
Confirm the pixel dimensions, ratio, format, file-size limit, photo count, branding restrictions and any crops the portals apply.
Ask the printer for the final size, bleed, colour profile and target PPI. Export from the original, not from a web JPEG.
Email and social media need their own exports too. A good website file can be far too heavy for email, and a social crop can cut out details a listing portal needs. Use clear names like 123-main-street-exterior_original.tif, _mls.jpg, _web-2000.jpg and _print-8x10.jpg.
Check the requirements for your listing
As of August 27, 2026, Zillow's official upload guidance recommends 2048 × 1536 pixels at a 4:3 ratio for home detail photos, accepts JPG among its supported formats, and says photos should be under 25 MB. Stellar MLS currently recommends 1024 × 768 JPG photos and allows up to 100 property photos on its reciprocal listings page. Those two official pages alone show why one “MLS export” preset for everything isn't safe.
Check the exact MLS, brokerage, syndication portal and print shop. Save the requirement you checked with the export preset.
Open the live listing. Look at the crops, order, colour, compression and whether syndication made a smaller copy.
Current official references: Zillow photo uploading tips and Stellar MLS reciprocal-listing specifications.
Use JPEG deliberately and convert web copies to sRGB
JPEG is efficient and accepted almost everywhere, but it throws away some information. Quality numbers differ between programs, so “quality 80” in one exporter isn't a standard. Compare what you can actually see and the final file size at the size people will view it.
- Export from the original once. Avoid opening and re-saving JPEGs again and again.
- Look at roof shingles, plants, window frames, railings, gradients and twilight skies for blocks, ringing or banding.
- Only strip the metadata you don't need, and keep private client information out of public files.
- Use sRGB for the web and portals unless the site says otherwise.
- Embed the print profile the printer asks for, rather than converting everything to CMYK.
Adobe's current guidance for viewing online recommends sRGB for web images, and converting non-sRGB files before they go on the web. Keep the wider or native working profile in the original where it makes sense.
Apply output sharpening to the final copy
Capture sharpening, creative sharpening and output sharpening each fix different problems. Judge the final pass after resizing, because resizing changes how edges look. A web thumbnail may need a different touch from a full-page print.
| Inspect | Failure signal |
|---|---|
| Rooflines and window frames | Bright or dark halos along edges |
| Branches and railings | Brittle, jagged or crunchy fine detail |
| Walls and skies | Noise or compression made more obvious |
| Fabrics, grass and stone | Fake texture that looks sharper but less natural |
Look at it at 100% and at the actual delivery size. If you can see the sharpening, back it off.
Evaluate resolution after AI editing
An AI result can have the same pixel dimensions as your upload and still lose real detail, and an upscaled file can be bigger without getting back any of the original information. Check the finished result by eye and by the numbers.
Check the original and the result have the same grid, allowing for any crop or rotation you meant to make.
Compare the roof edges, window frames, plants, furniture, signs, texture and fine repeating patterns.
Watch for smeared branches, warped window frames, repeated textures, painterly surfaces and replacements that are over-sharpened.
Twilight skies, smooth walls and soft shadow edges show banding, blocks and heavy re-compression very quickly.
Download the actual file the client will get. Don't judge from a browser preview, a thumbnail or what the metadata claims.
Relight Spaces is built to give you back results at the same pixel dimensions you uploaded. The real test is still the downloaded file: check the dimensions, crop, visible detail and compression before it goes to a client.
Build three exports from one approved original
- Finish and archive the original. Keep the full pixel dimensions and the working colour information.
- Make a copy for where it's going. Never resize your only finished copy.
- Crop on purpose. Match the destination's ratio while protecting the property's important features.
- Resize once. Use the current pixel size you've checked, or work out print size from the pixels and target PPI.
- Convert the colour. sRGB for the web, or whatever profile the printer asks for.
- Go easy on output sharpening. Judge it on the final-size file.
- Set JPEG quality by eye. Stay under any file-size limit without visible damage.
- Open the file you delivered. Check the dimensions, profile, crop, detail and how it actually looks live.
Upload the file you plan to deliver, then check the downloaded result before you make copies for each destination.
Resolution and export FAQ
Is 72 DPI enough for a real estate photo?
For a screen, what matters is the pixel dimensions. Changing the 72 PPI number in the file doesn't change the pixels or the detail you see. For print, divide the pixel dimensions by the PPI you want to get a rough physical size.
What resolution should I export for MLS?
There isn't one MLS size. Check the current rules for your exact MLS and the portals it feeds. Keep a full-resolution original, then make a separate MLS copy at the size, aspect ratio, file type and file size they ask for.
Should real estate photos use sRGB?
sRGB is the safest choice for the web and listing portals. A printer might ask for a different profile, so keep the original and follow that printer's current specs for the print copy.
Does a larger JPEG file always mean better quality?
No. File size depends on the number of pixels, how much detail is in the photo, the metadata and the compression. Look at the actual pixel dimensions and the detail you can see. File size alone doesn't prove anything.
Can AI editing preserve the uploaded resolution?
It can, but check the file you actually get rather than taking anyone's word for it. Compare the pixel dimensions, crop, edge detail, texture and compression of the original and the result at 100%. Upscaling isn't the same as keeping the original detail.
When should sharpening be applied?
Sharpen for output after the final resize, and for where the photo is going. Screen and print copies need different amounts. Check the rooflines, window frames, branches and textured surfaces for halos or crunchy detail.